A Long Lasting, Heat Proof Face
As the weather is heating up, so are our faces and that only means one thing.... Sweaty upper lip, melting foundation and slippy eye lids, nice. We all know that heat and makeup just don't go together, how ever much you powder it down or how ever high or low a coverage foundation you go, the two just don't mix. SO... To prevent all of this happening on our faces, I created a look with creamy formulas and a long lasting lip that lock in place and beat the heat. uh, cringe. You may be thinking why am I layering on the cream products for a long lasting look, surely I should be using powders? That's where ya wrong. For me, cream products last so much longer on my skin in the sun and with powders, well, when I get sweaty, let's just say they somewhat disappear. With all these weather changes, you do have to re think the makeup bag and current face situation, whether it's taking away some products or adding in some extra steps, it could make all the difference. So, if you are jetting off somewhere hot and want a fresh makeup look that will take you through day to night or you're a tube traveller and we all know how hot n sweaty the tube gets, then watch this space.
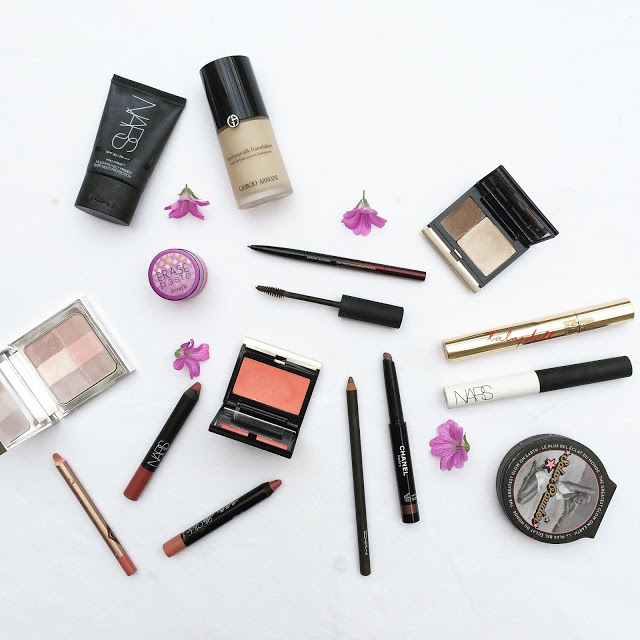
Just a heads up, as this is a super long lasting look with a matte-ish lip then it is vital to get as much moisture into your skin prior to application. Slather on the moisturiser and serums in the morning to give your skin a thirst quenching drink and get some lip balm on! The first product I'm going to use is one you see me use a lot in makeup looks. It's the NARS Multi Purpose SPF 30 Primer and I have become a little obsessed with this one. It's just so hydrating and makes your skin feel plump with a healthy glow. Now for foundation, the only option for this really was the Giorgio Armani Luminous Silk in 4 as it is by far my most long lasting foundation that still gives a natural looking finish and a touch of dewiness to the skin. This seriously locks down on the skin and covers without looking cakey. Oh and it will not budge until you attack it with a hot cloth cleanse int the evening. One pump of this buffed in with my Real Techniques Expert Face Brush does the whole face. With the right coverage all over, it's time to go in with concealer under the eyes to get rid of those dreaded dark circles. When it comes to picking a concealer that lasts and covers, I didn't really have any other option than my Benefit Erase Paste. I scoop a little of this out and warm it up in the palm of my hand with my fingers, ready to be pressed under my eyes and blended in with my Real Techniques Miracle Complexion Sponge for a flawless eye area that is dark circle free.
For me, any cream product works better than powder in terms of giving me my preferred finish and beating the sun so skipping a light reflecting powder and golden bronzer for now, I'm going straight to the creams. Starting with a natural looking contour, I'm taking my Kevyn Aucoin Creamy Sculpting Duo #4 in the hollows of my cheeks with my RT Expert Face Brush. The blush that lasts forever on my skin and I love using is theKevyn Aucoin Creamy Glow in Tonsoleil due the beautiful coral colour and creamy consistency. I go back in with the same brush here, dabbing it into the pot before swirling it around on the apples and tops of my cheeks. This is such a beautiful shade for Summer and one that would suit a mixture of skin tones, perfect for the ultimate summer glow. ANDD it's hydrating enough to wear on the lips. To finish of the cheeks, a highlight is needed and my go to right now for something long wearing is the highlight shade of the KA Sculpting Duo. Now for the real sandwich topper, powder. To lock everything in place without taking away the glow I apply a light dusting of the Bobbi Brown Brightening Nudes Powder. This is so light you can't notice it on the skin, it simply adds a touch of longevity without adding coverage. With contour already done, at this stage if I wanted to warm up the perimeter of my face a bit more then I would take some Soap and Glory Solar Powder on a Real Techniques Blush Brush and dust it on.
Now onto the eye shadow for this look which is probably the most simple step of the entire look. One product eyes? yes please. Well 2, if you count the fabulousNARS Pro Prime Smudge Proof Eye Shadow Base. I have pretty slippy eye lids anyway that tend to gobble up anything that goes on the lid so for me, this is an essential for a long lasting eye. So once that is blending in with my fingers, I move onto my eye shadow stick of choice and I am going for my Chanel Stylo EyeShadow Fresh Effect in Caroube. My true love of the eye shadow stick world. AHH. One eye at a time, I'm taking this metallic taupe bronze from the outer corner to the inner corner, right up the crease line and then I blend blend blend with myMAC 289 Shader Brush. Something I never usually do is apply eye liner but for a look like this, especially with this eye colour then MAC Coffee Eye Pencil is the perfect way to finish it off. I run a thin line incredibly close to the upper lashes just to give some more definition and then take a tincy wincy bit under the eyes and blend, again with my MAC brush. With mascara, I had to go with my old favourite YSL Baby Doll as it ensures me hours of curled lashes that don't drop, droop or smudge. Time for brows, I have a bit of a brow dream combo for you today, one I will always use if I'm going out or want some extra definition and it all starts with my Kevyn Aucoin Brown Definer in Brunette, first taking the spoole on the end to brush through my brows before lightly filling them in towards the end in upwards motion. I avoid the front of my brow to keep them looking as natural as I can and press very faintly so I'm not left with any harsh, sharp lines. A brow gel is essential and probably the only product out there for you if you want your brows to stay in place all day. With a gentle brush through of my NARS Brow Gel, my hairs are locked in place.
So for lips, I want something super duper long lasting with a precise lined edge, meaning it's got to be matte, leaving me with just two options. Starting with the Charlotte Tilbury Pillow Talk Lip Cheat, I add a soft line around the edge of my lips, followed by lightly filling in the entire lip. This extra little step will keep my lip pencil on for longer and ensure it doesn't run or bleed onto my face. The NARS Velvet Matte Lip Pencil in Bahama , a dark nude with brown undertones that glides onto the lip with one stroke and will not budge. If you are looking for something more budget friendly, then the Me Me Me Cosmetics Lip Pencil in Truffle is a perfect dupe in terms of colour, just a little less matte and long lasting.
So there you have it. A long lasting makeup look that will keep you glowing all day with this smudge free base, matte lip and a locked in place eye shadow. With the power to last all day without being heavy and thick, will you be trying out this makeup look? Subtle, effective and lightweight.